

Navigating the Medicare system, especially when it comes to renewing or selecting a Part D prescription drug plan, can feel overwhelming. But a little preparation can save you time, reduce stress, and ensure you’re making the best decisions for your healthcare needs.
Medicare Part D Renewal: What to Know
If you’re happy with your current Medicare Part D drug plan and want to continue with it in 2025, you don’t have to do anything. Your plan will automatically renew for the upcoming year.
But if you’re enrolling for the first time, it’s essential to understand the process to make informed decisions about your prescription drug coverage. Here’s a simplified step-by-step guide to help you through the Medicare Part D enrollment process.
How to Enroll in Medicare Part D
Step 1: Get Started on Medicare.gov – The first step in renewing your Medicare Part D plan is navigating to the official Medicare site. Here, you can find and compare available health and drug plans.
Step 2: Click the “Find Plans Now” button under the Find Health & Drug Plans section – This will bring you to the Medicare plan finder tool.

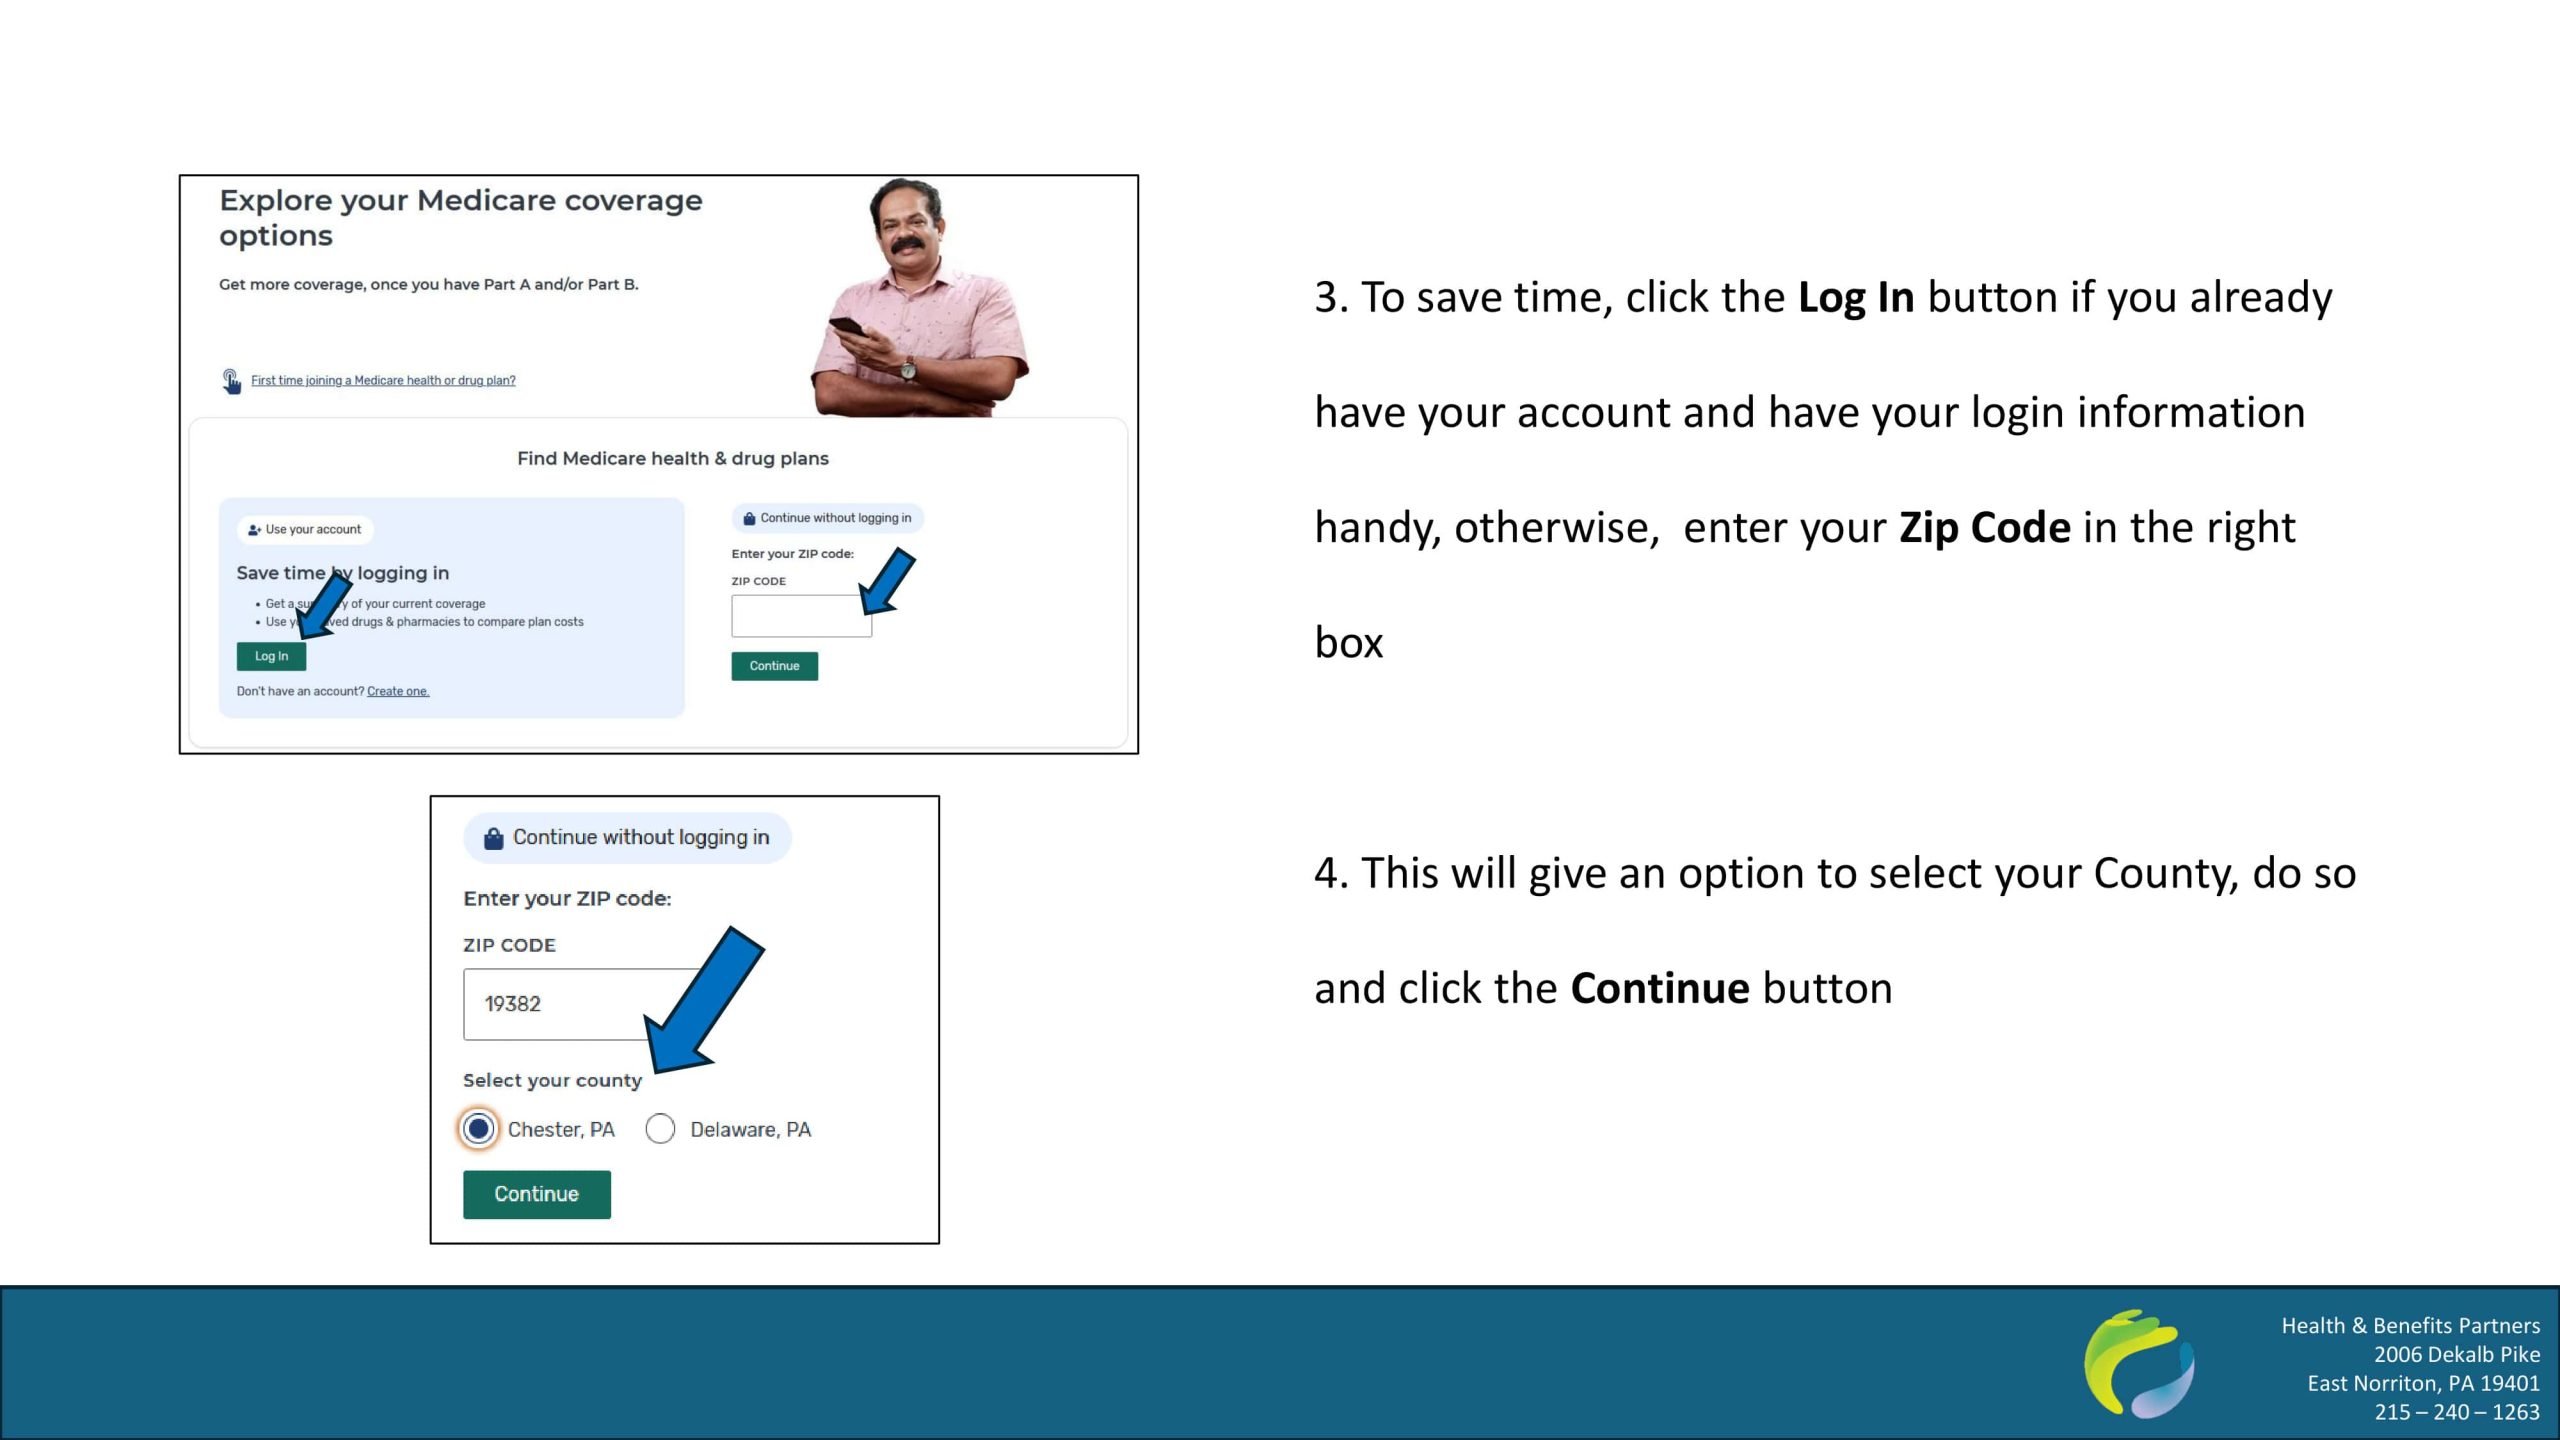
Steps 3 and 4: Log in or enter your ZIP code – If you already have an account, logging in will save time. If not, simply enter your ZIP code to begin. You’ll be prompted to select your county. Then click Continue.
Step 5: Select Your Current or Desired Plan – Choose the type of plan you are currently enrolled in or wish to enroll in. For prescription drug coverage, this would be a Medicare Drug Plan (Part D). Then click the “Find Plans” button to view your options.

Step 6: Review Your Cost Assistance Options – At this point, Medicare will ask if you receive assistance from any financial aid programs to cover prescription drug costs. If you’re unsure, you can select “I’m not sure,” but this will require you to log in to your account. Selecting the appropriate option here will help tailor the plan options to your specific financial situation (Note: Clicking an option will provide an explanation of that option). After you’re done, click Next.

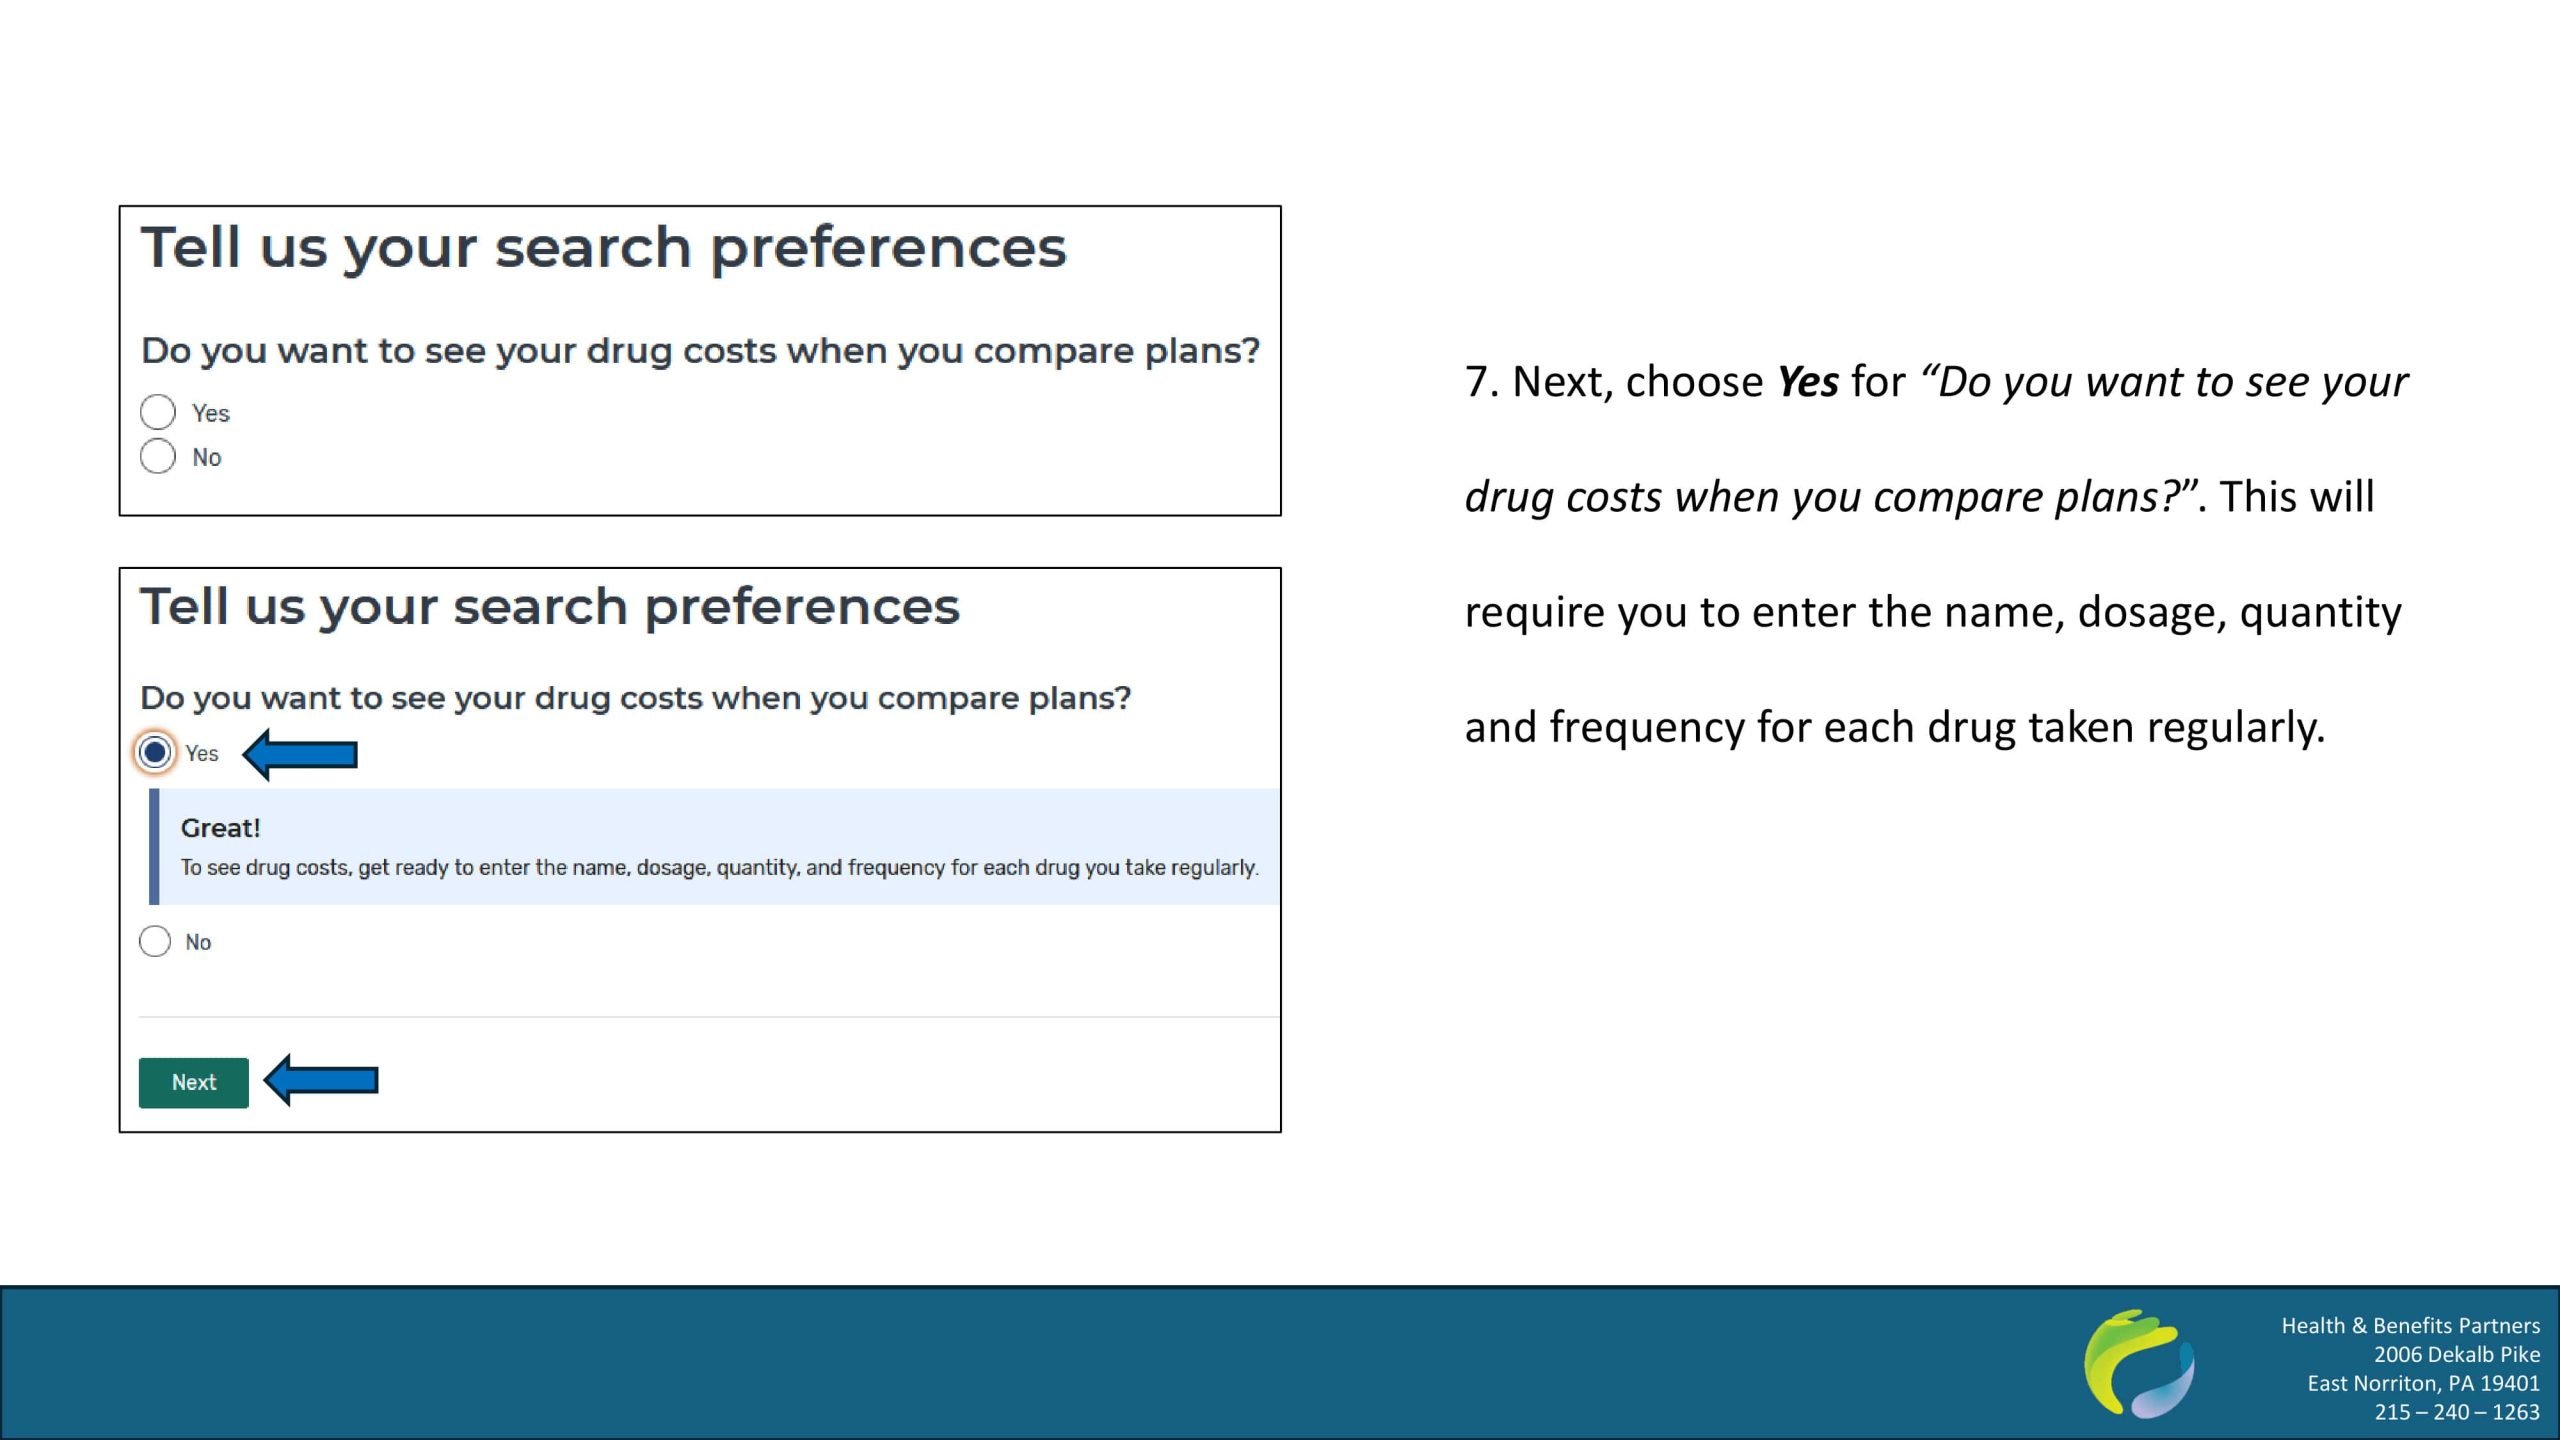
Step 7: Compare Your Drug Costs – Select “Yes” for “Do you want to see
your drug costs when you compare plans?”. To get the most accurate comparison, you’ll need to enter the details of the prescription drugs you take regularly. This includes:
- The drug name
- Dosage
- Quantity
- Frequency of use
By entering this information, Medicare can calculate your out-of-pocket costs for each plan, allowing you to make a more informed decision.
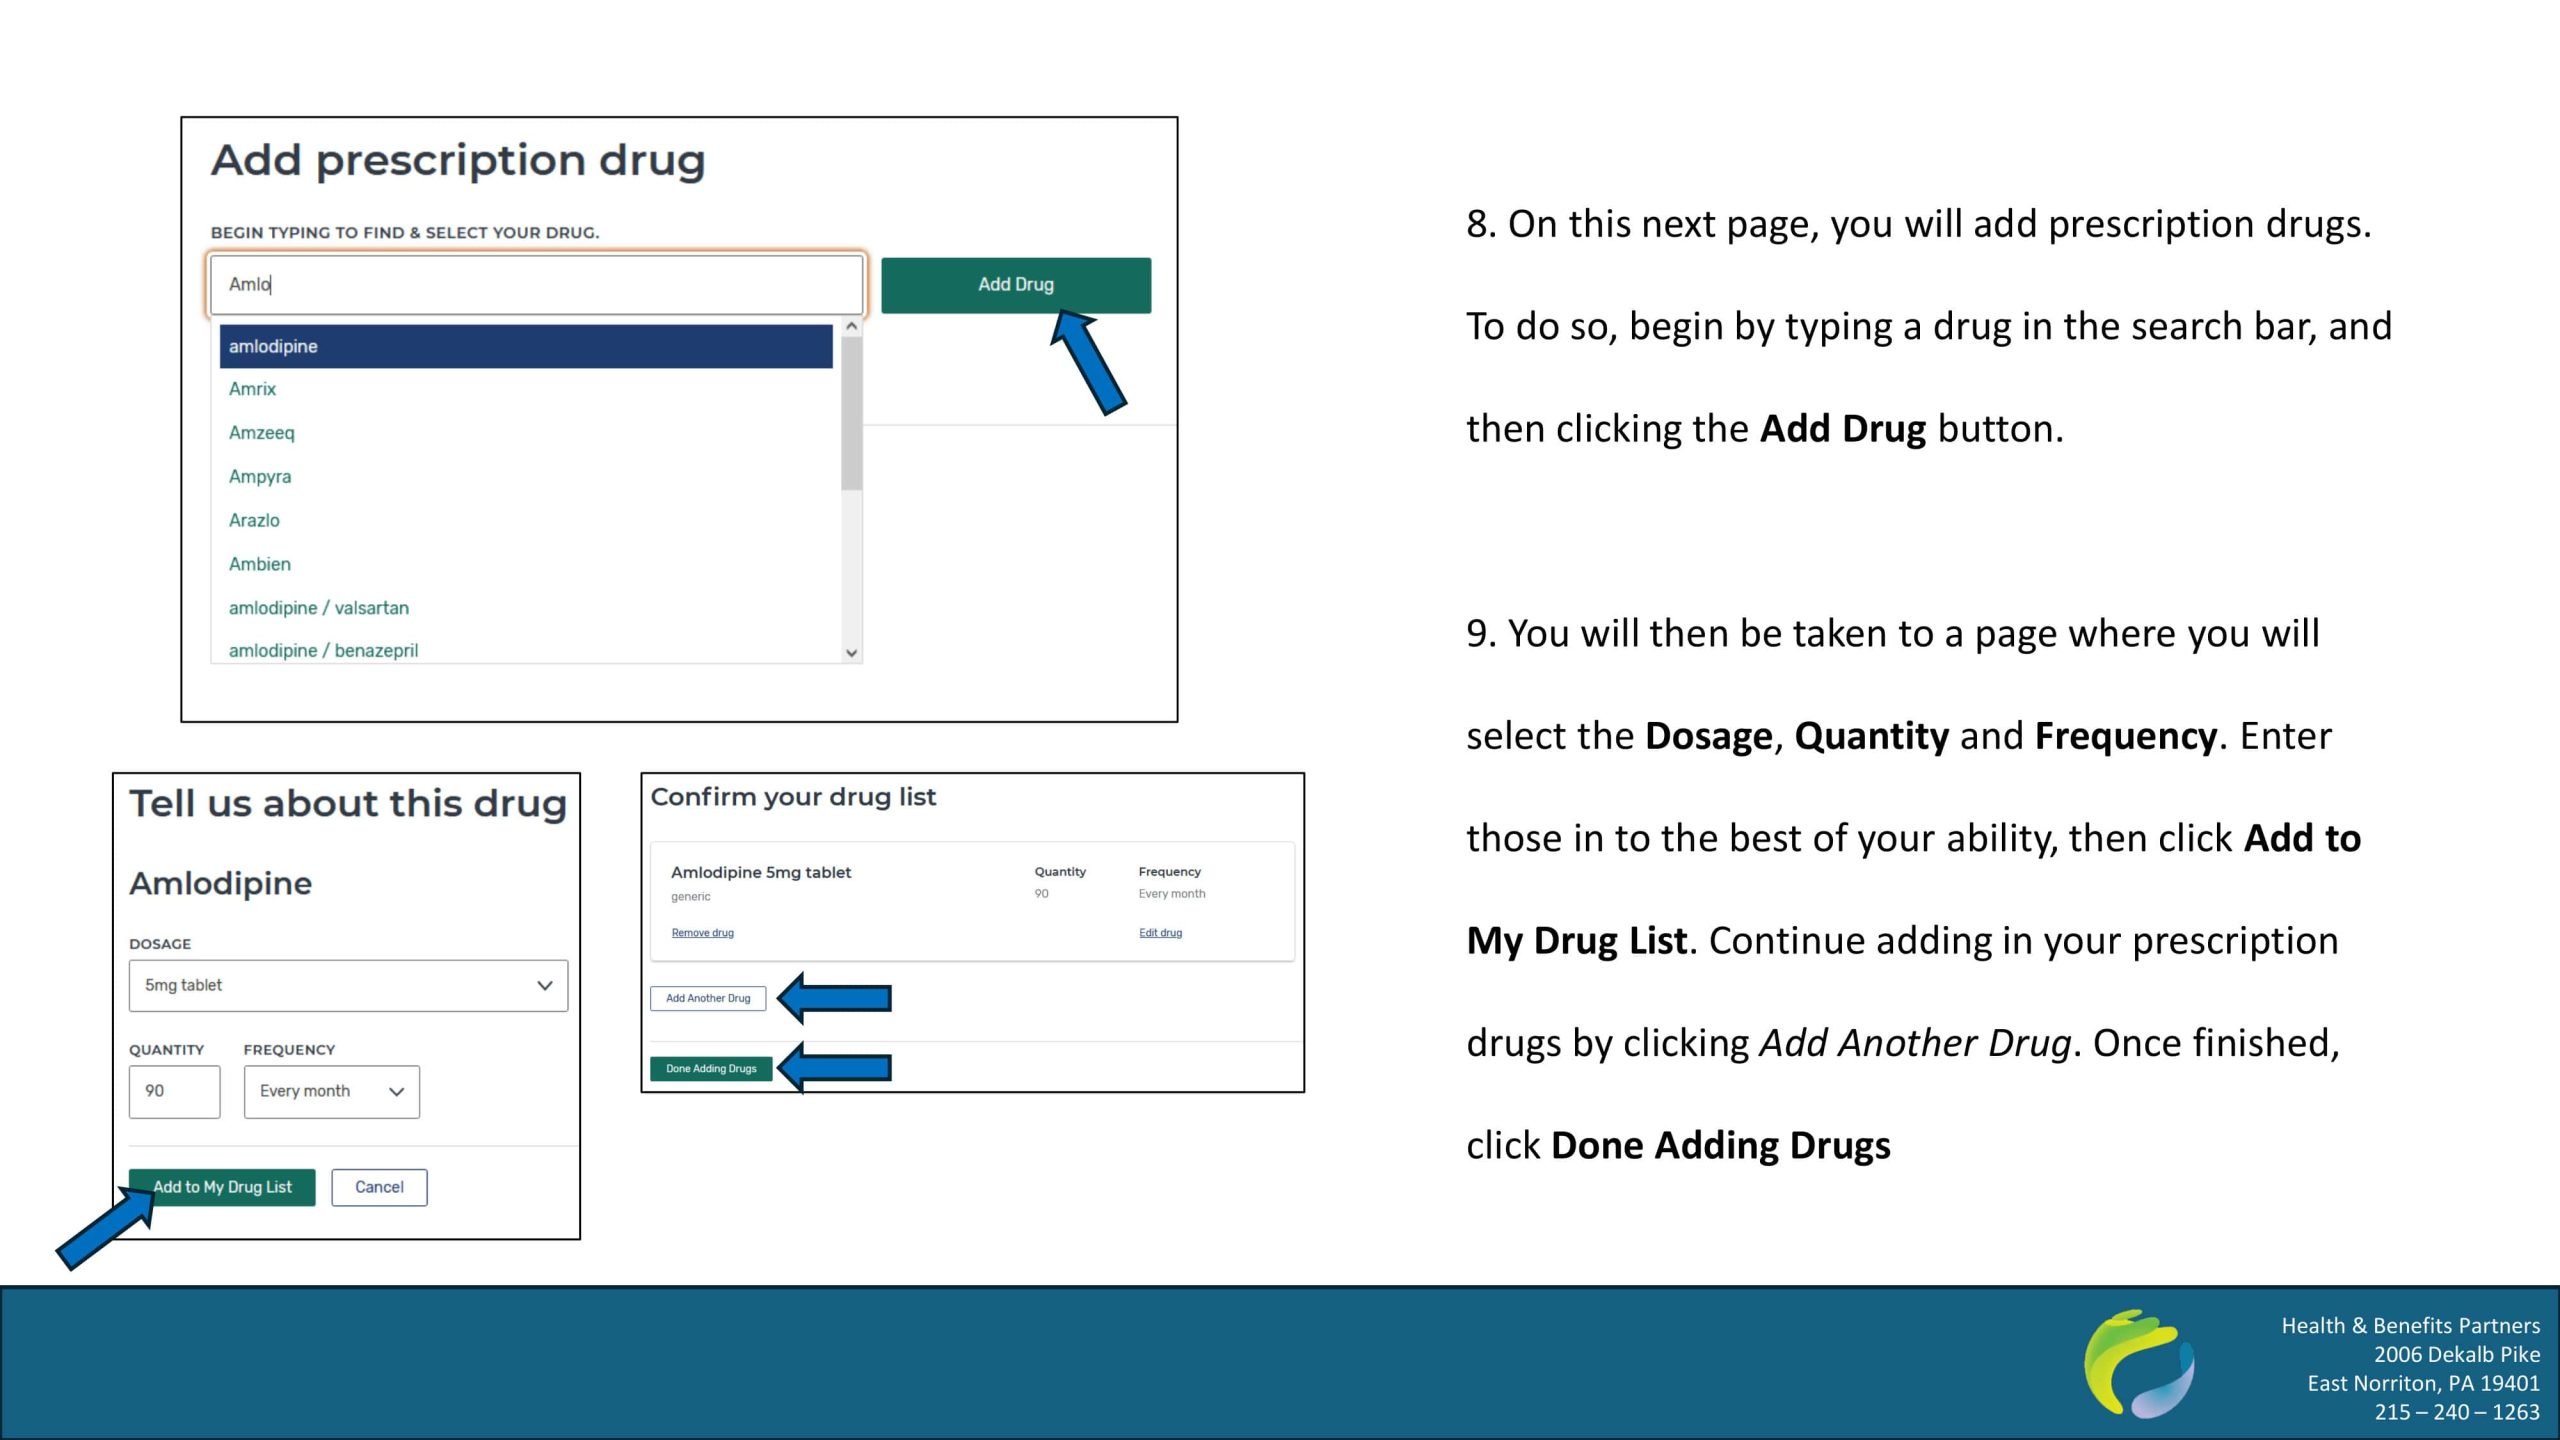
Steps 8 and 9: Add Your Prescriptions – On the next screen, you’ll be able to add each prescription drug by typing its name into the search bar and clicking “Add Drug”. After adding a drug, you’ll be prompted to specify the dosage, quantity, and frequency of use. After that, click “Add to My Drug List”. Continue this process for each medication. Once complete, click “Done Adding Drugs” to proceed.
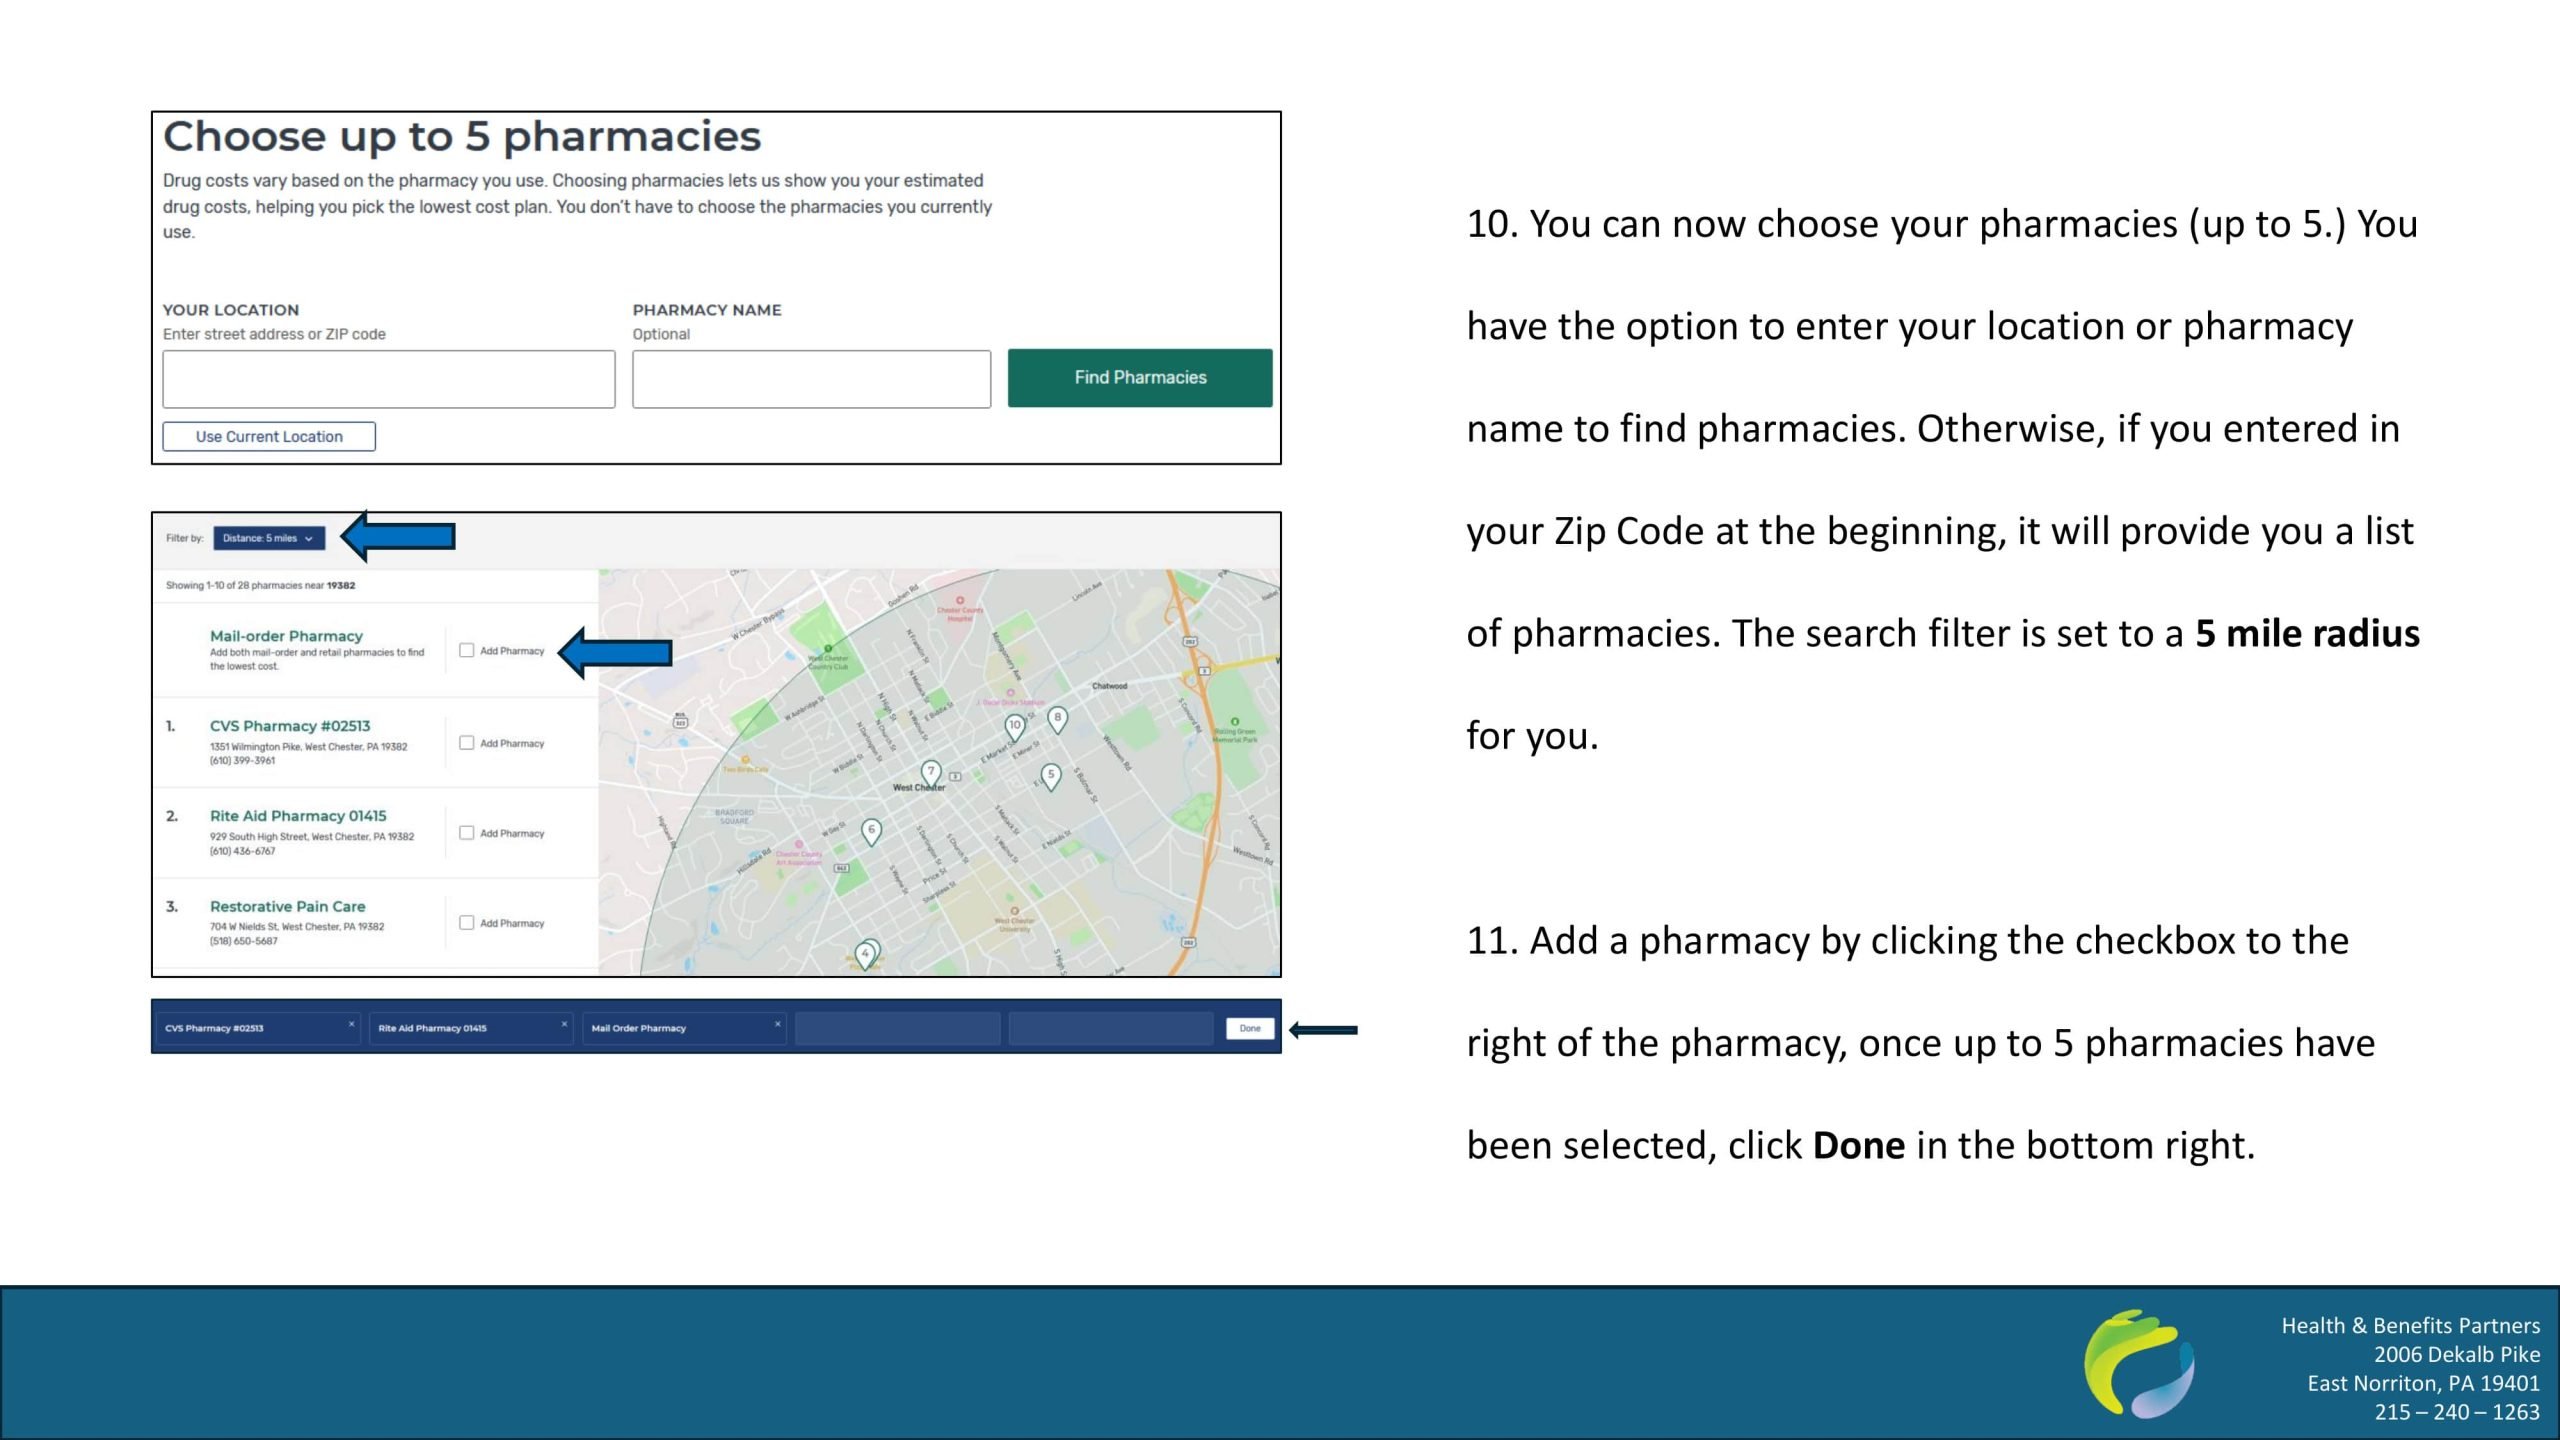
Steps 10 and 11: Select Your Preferred Pharmacies – Medicare allows you to choose up to five pharmacies to fill your prescriptions. You can search for pharmacies based on your ZIP code or enter the specific name of the pharmacy you prefer. The search filter is automatically set to a 5 mile radius for you. Add a pharmacy by clicking the checkbox to the right of the pharmacy. Once you’ve made your selections, click “Done.”
Step 12: Review and Compare Plans – Now comes the crucial step of comparing available plans. You can filter your options by insurance carrier or star ratings. Or you can also sort the plans based on factors like:
- Lowest drug + premium cost
- Lowest yearly drug deductible
- Lowest monthly premium
These filters and sorting options can help you narrow down the best plan for your financial and medical needs. If you want a more detailed look at any particular plan, click “Plan Details.” This will give you a comprehensive view of the plan, including:
- What you’ll pay
- An overview
- Drug coverage specifics
- Star ratings for the plan
Once you’ve found the plan that works for you, click the “Enroll” button from either the search results or the plan details page.


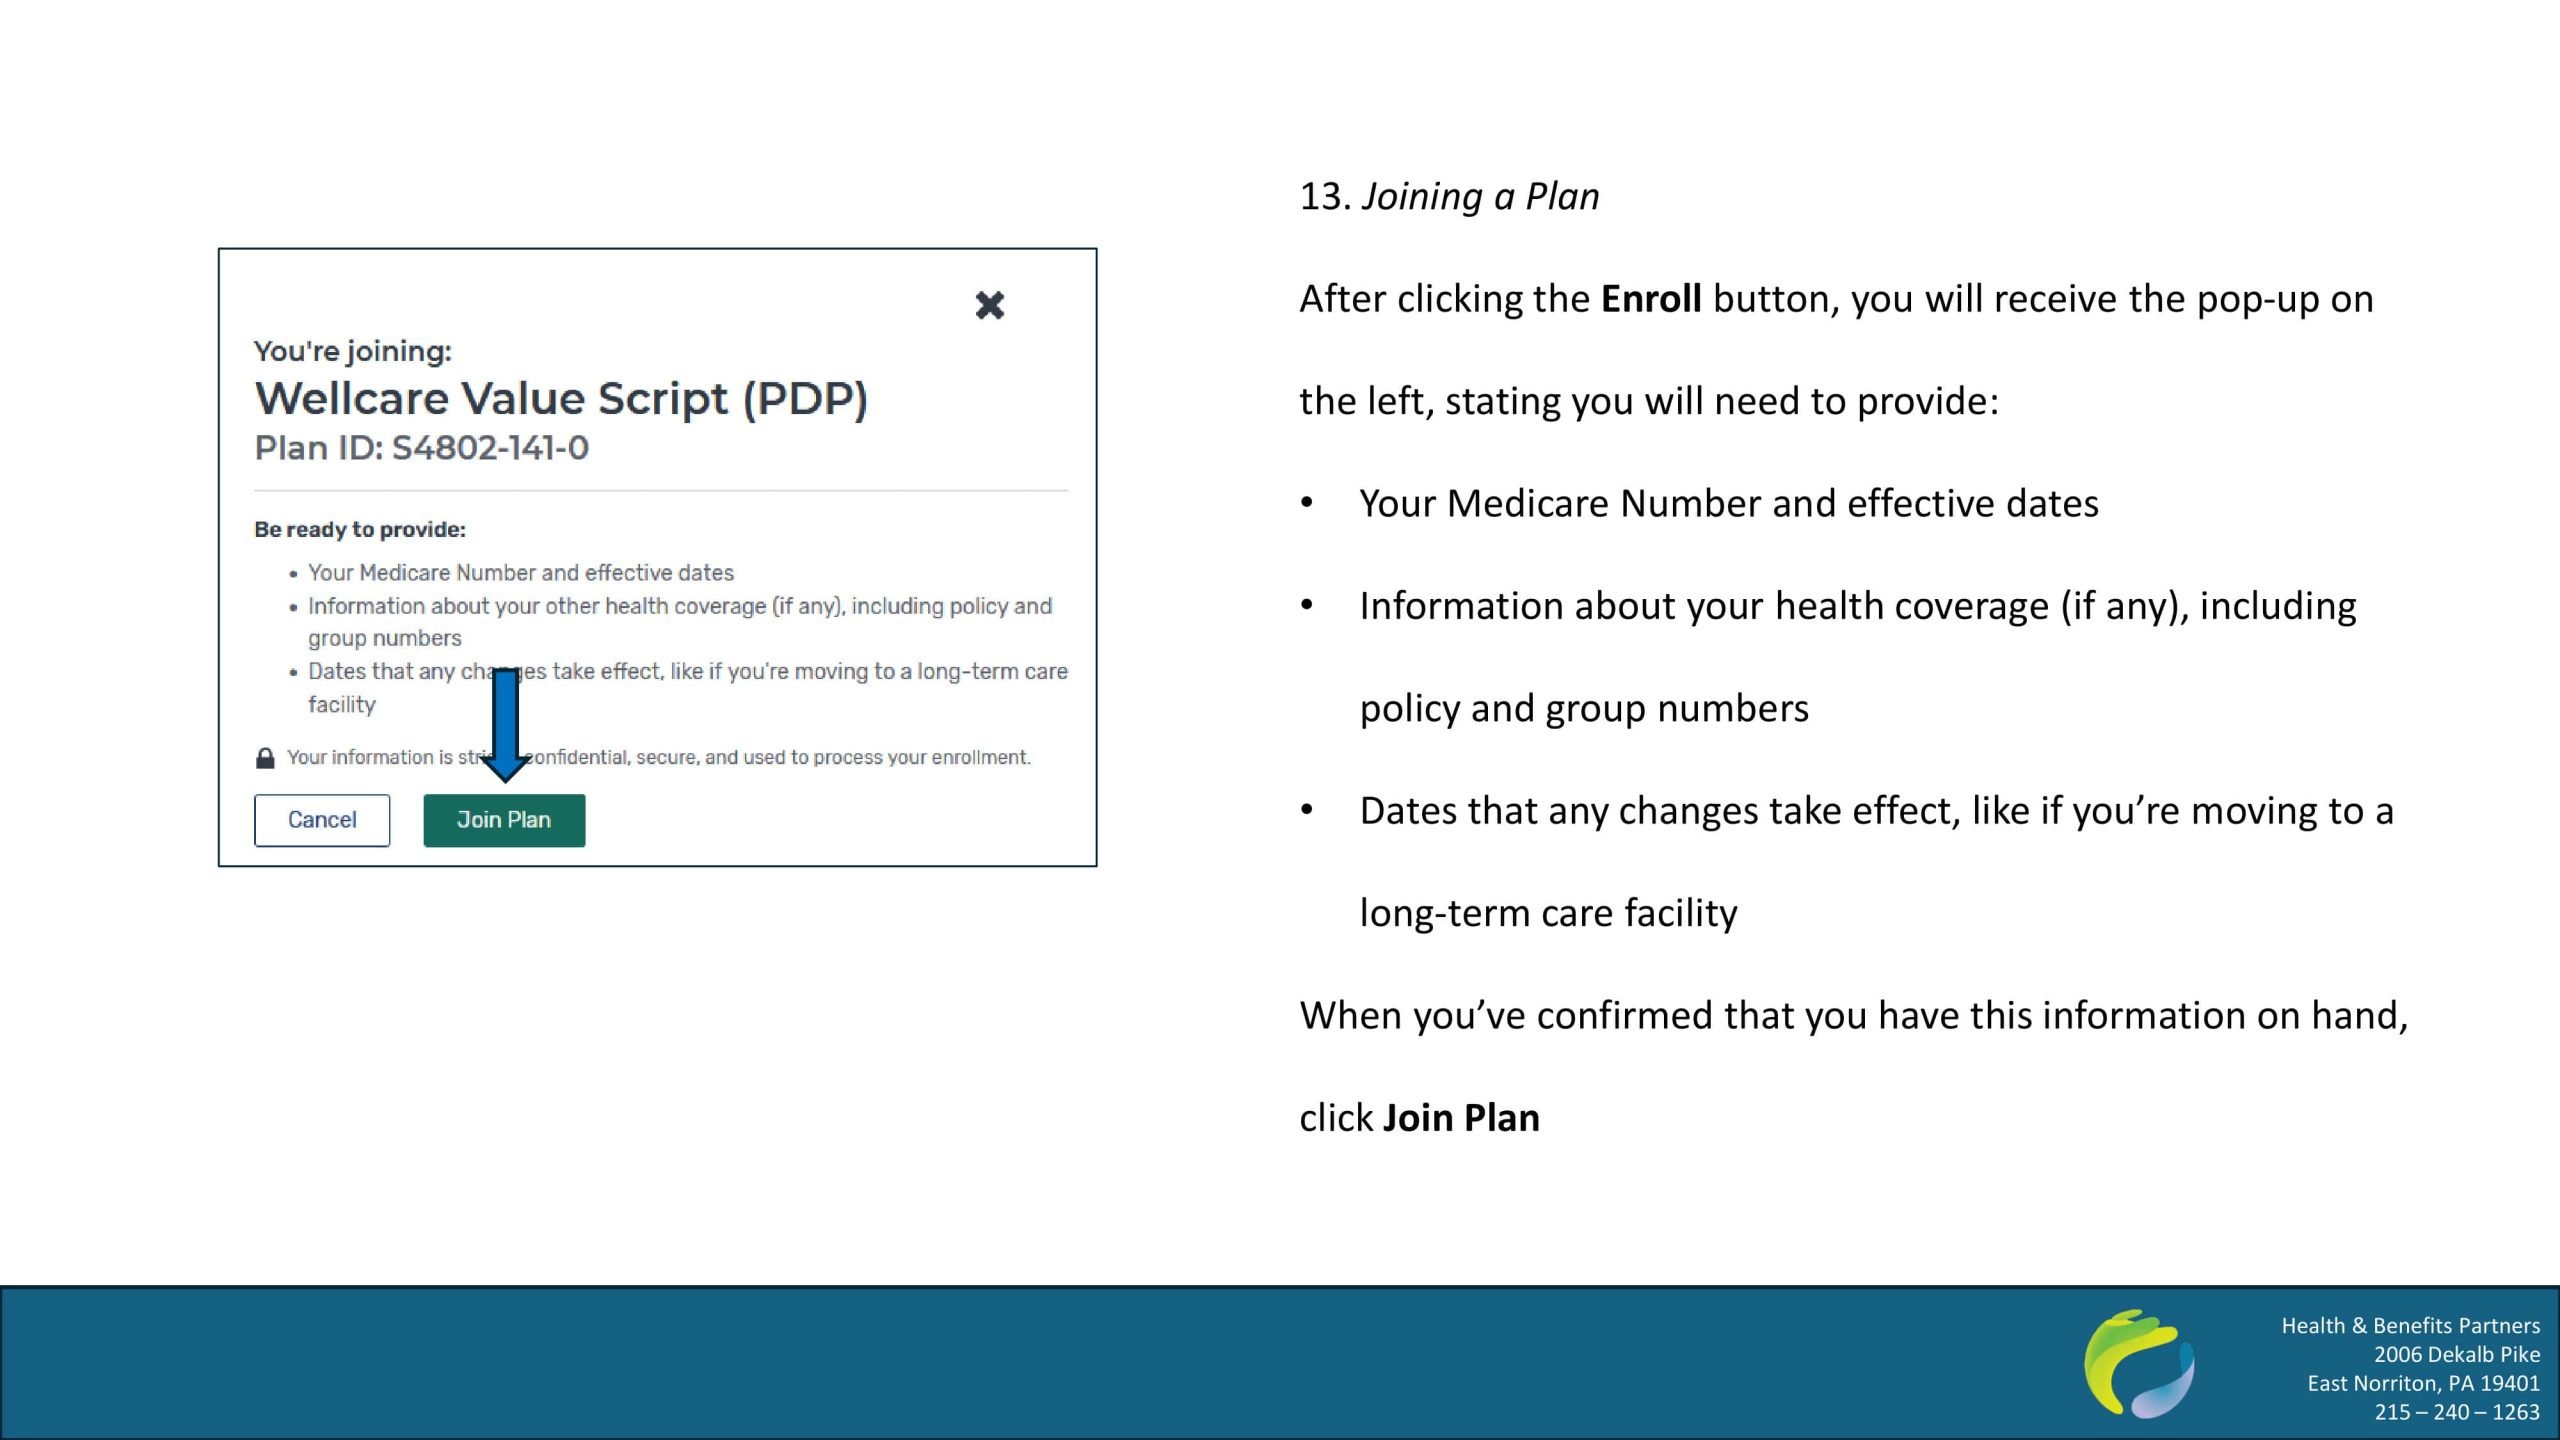
Step 13: Joining a Plan – After clicking the Enroll button, you will see a pop-up. You will need to provide:
- Your Medicare Number and effective dates
- Information about your health coverage (if any), including policy and group numbers
- Dates that any changes take effect, like if you’re moving to a long-term care facility
When you’ve confirmed that you have this information on hand, click “Join Plan”.
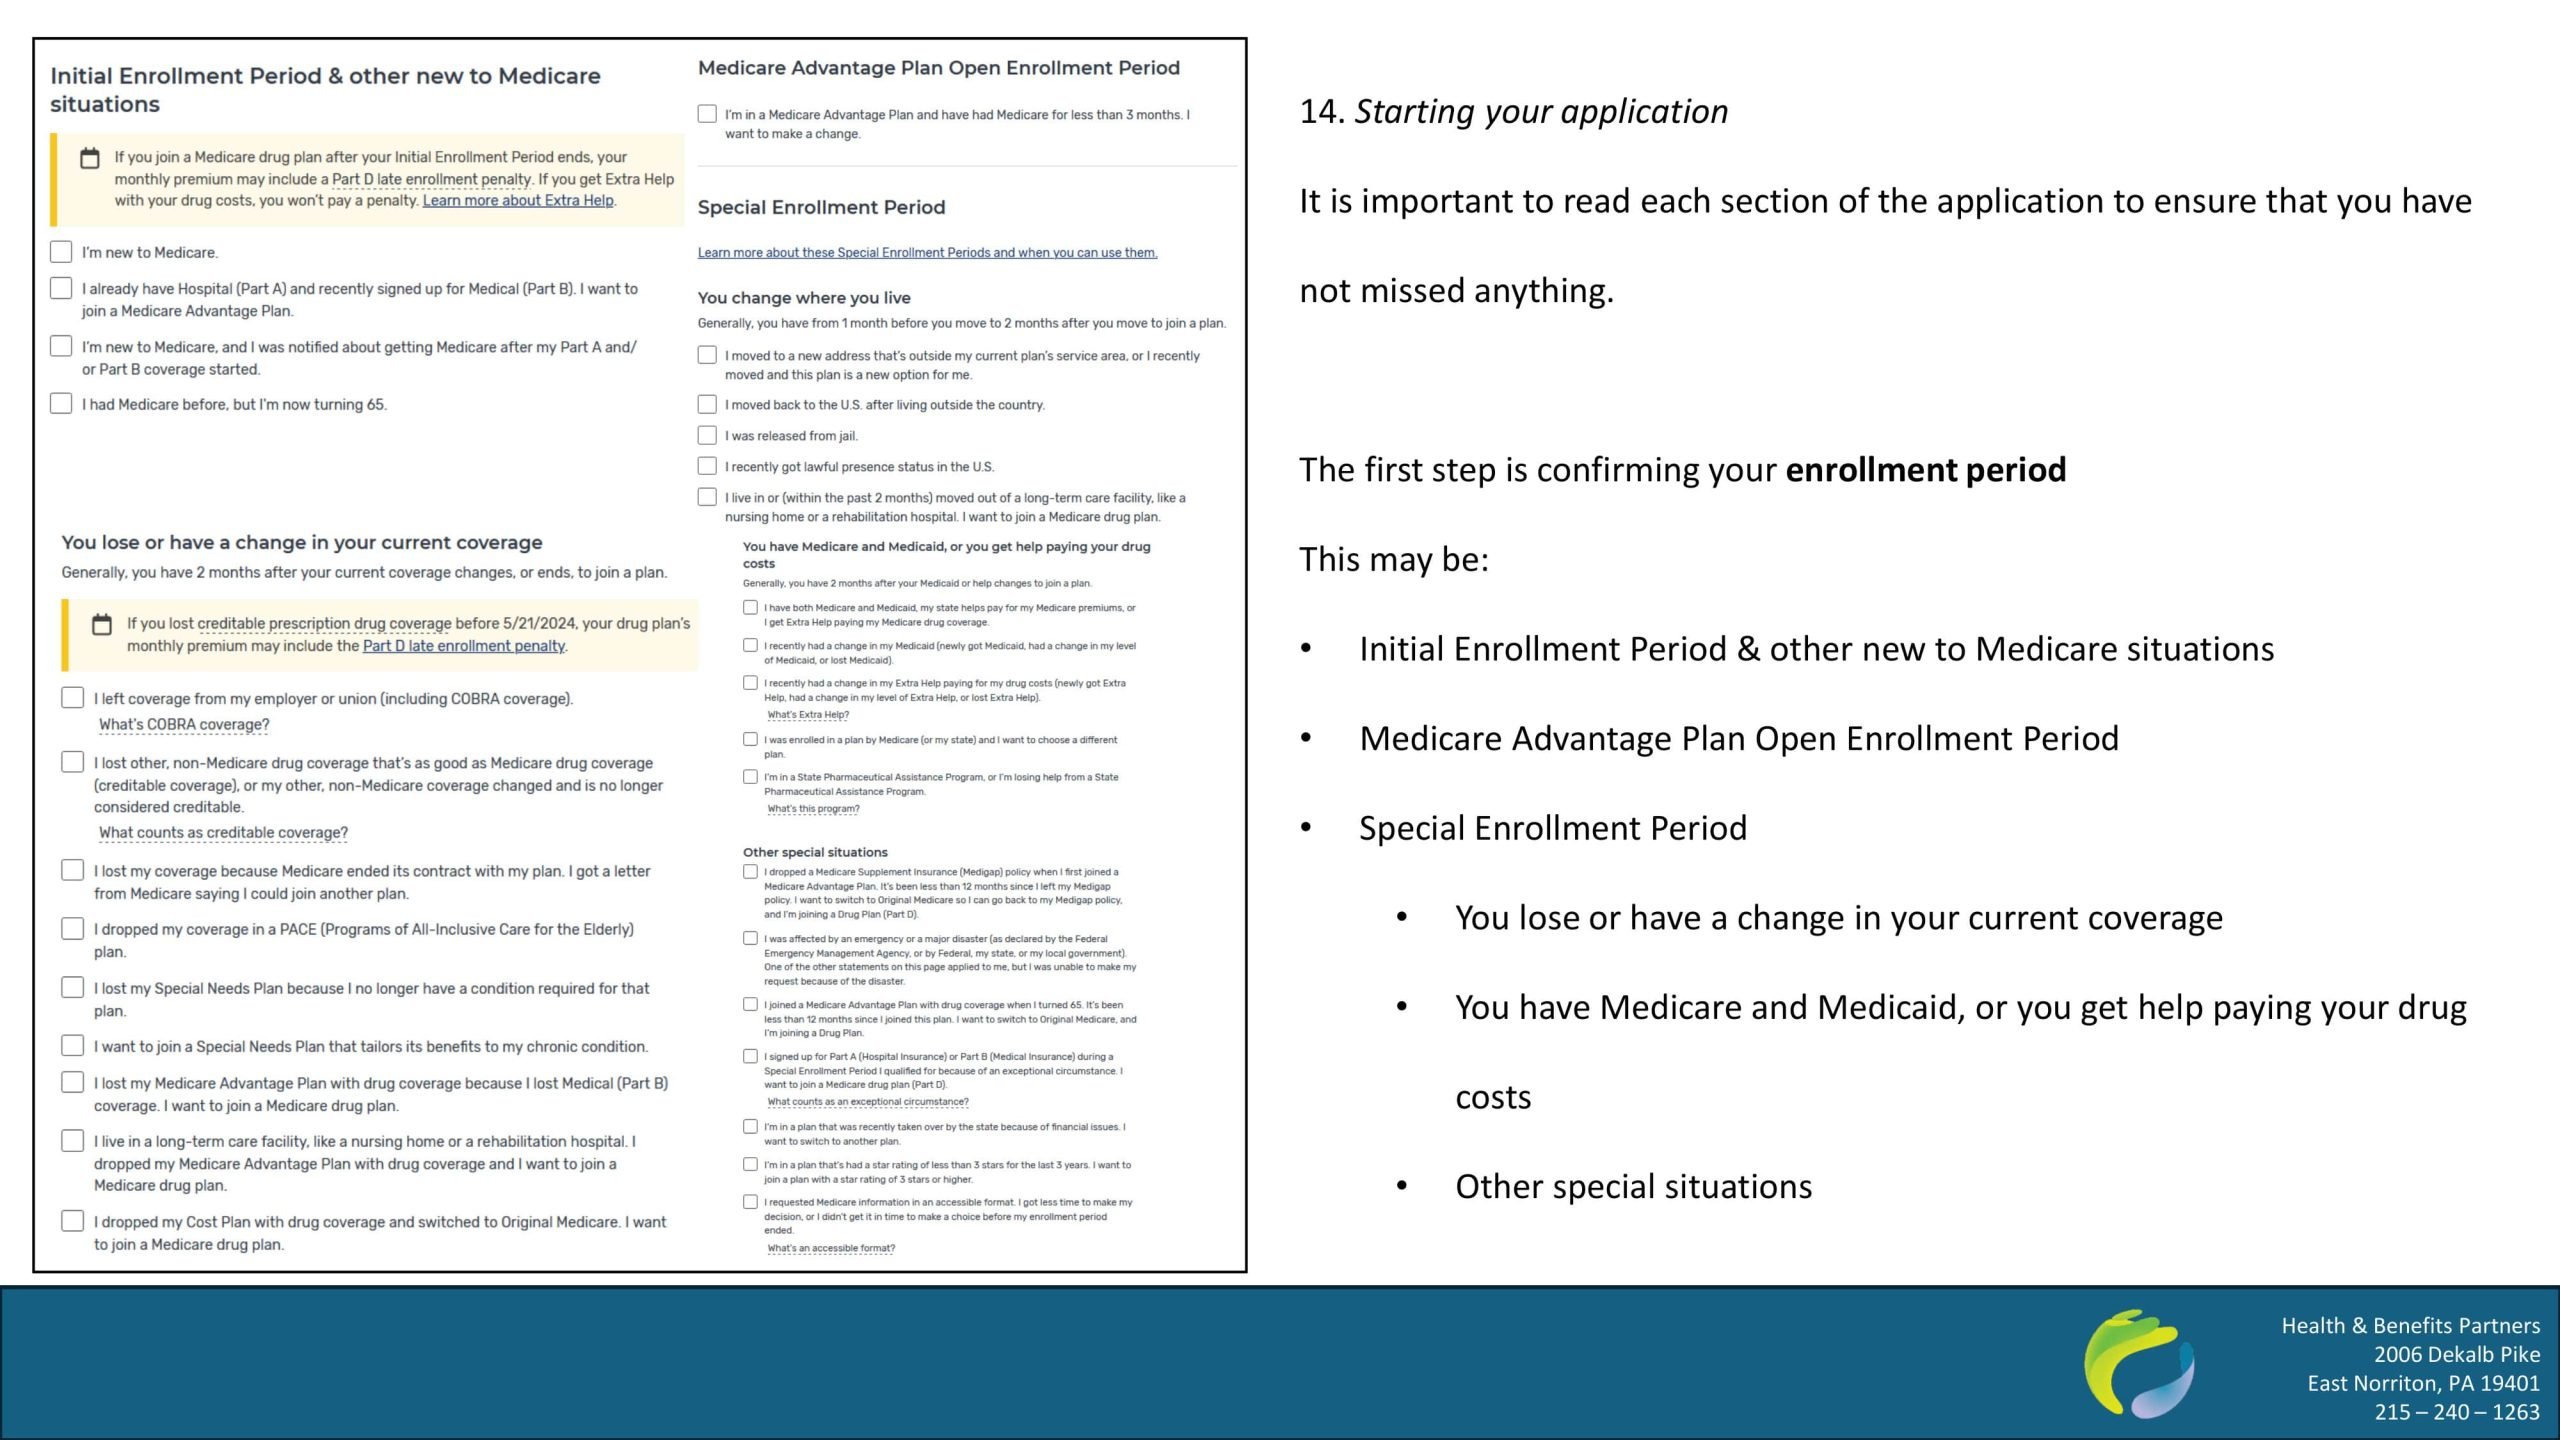
Step 14: Starting Your Application & Adding Your Information – It is crucial to carefully review each section of the application to ensure that nothing has been overlooked. First, confirm your enrollment period is correct. This may be:
- Initial Enrollment Period & other new to Medicare situations
- Medicare Advantage Plan Open Enrollment Period
- Special Enrollment Period
- You lose or have a change in your current coverage
- You have Medicare and Medicaid, or you get help paying your drug costs
- Other special situations (including qualifying life events)
After that, add your Medicare information:
- Your Medicare number
- First Name
- Last Name
- Date of Birth (MM/DD/YYYY)
- Sex
- Phone Number
- Optional ethnicity and race information
Once that’s completed, enter your permanent residence information (if your mailing address is different from the address where you live, select the checkbox and add your mailing address):
- Address Line 1
- Address Line 2 (optional)
- City
- State
- Zip Code & County (this should be prefilled)
Answer the questions shown:
- Do you have other drug coverage that you’re keeping in addition to this plan?
- If Yes, enter the Company Name of Other Coverage, Member Number, and Group Number
- Do you work? (optional)
- Does your spouse work? (optional)
- Do you want to get materials from your plan by email?
- Select the language if you don’t want to get plan materials in English (optional)
- Select a format if you want to get materials in an accessible format (optional)
Next, select how you would like to pay your plan premium (this question is optional). You can select one of the following options:
- Deduct it from my Social Security or Railroad Retirement Board
benefit each month - I want the plan to bill me each month
Now it’s time to sign the plan agreement. Click the checkbox “I’ve read and agree to these statements”. Then select who the person is completing the application:
- I am the person joining the plan (or I am helping the person join the plan)
- I am the person legally authorized under state law to act on behalf of the person joining the plan
After signing the plan agreement, you can review your application before submitting it. Review all the information you entered and select “Edit” in any section you need to make changes in. After you’re satisfied that everything has been filled out correctly, you can submit your application by clicking the checkbox next to “I understand that by selecting ‘Submit’, I have read and understand the contents of this application. I confirm that I am submitting an application to join Wellcare Value Script (PDP).” Once submitted, click “Done”, this will provide you with a confirmation number and telephone number for the carrier if you have questions. If this is not clicked, your application won’t register at the carrier.
Completing Your Enrollment In Medicare Part D
By following these steps, you can confidently navigate the Medicare Part D enrollment process. If you need further assistance, don’t hesitate to contact a trusted health insurance advisor, like Health & Benefits Partners, for personalized support. Our team can help you understand your options, ensure you’re enrolled in the right plan, and guide you through any challenges along the way.

